
Ensuring that TCP connections are enabled in SQL Server is a crucial step for optimal network communication. In this guide, we’ll walk you through the process using two popular methods: SQL Server Configuration Manager and PowerShell.
The aim is to streamline the information, making it easy for you to enable network connections in SQL Server, and provide additional tips for a seamless experience.
Enabling SQL Server Network Protocol using PowerShell
We can enable the TCP/IP Network Protocol for a SQL Server Instance using a PowerShell script provided by Microsoft: Enable or Disable a Server Network Protocol.
Please note:
1. This script requires sqlps, run Import-Module "sqlps" for the functions to work.
2. This script automates the process, including a restart to the SQL services.
## Enable/Disable MSSQL TCP & Named Pipes
$smo = 'Microsoft.SqlServer.Management.Smo.'
$wmi = new-object ($smo + 'Wmi.ManagedComputer').

# Enable TCP Protocol for the locl machine
$uri = "ManagedComputer[@Name='" + (get-item env:\computername).Value + "']/ServerInstance[@Name='MSSQLSERVER']/ServerProtocol[@Name='Tcp']"
$Tcp = $wmi.GetSmoObject($uri)
$Tcp.IsEnabled = $true
$Tcp.Alter()

# Enable Named Pipes Protocol for the local machine
$uri = "ManagedComputer[@Name='" + (get-item env:\computername).Value + "']/ServerInstance[@Name='MSSQLSERVER']/ServerProtocol[@Name='Np']"
$Np = $wmi.GetSmoObject($uri)
$Np.IsEnabled = $true
$Np.Alter()

# Restart the SQL Services
$DfltInstance = $Wmi.Services['MSSQLSERVER']
$DfltInstance.ServiceState
$DfltInstance.Stop();
Start-Sleep 1
$DfltInstance.Refresh();
$DfltInstance.ServiceState
Start-Sleep 1
$DfltInstance.Refresh();
$DfltInstance.ServiceState
$DfltInstance.Start();
Start-Sleep 1
$DfltInstance.Refresh();
$DfltInstance.ServiceState

Enabling TCP/IP in SQL Server Configuration Manager
1. Access SQL Server Configuration Manager: Open SQL Server Configuration Manager from the Start menu. For SQL Server 2019, navigate to the appropriate version in the Configuration Manager.

2. Navigate to TCP/IP Protocols: Locate the TCP/IP Protocols, as highlighted, and open the Properties.
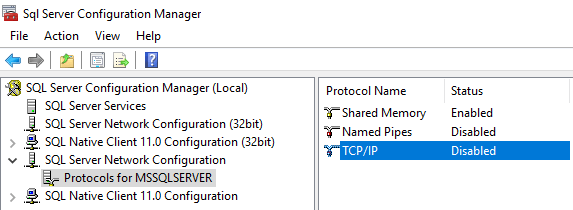
3. Enable TCP/IP: Within the Protocol tab, enable the highlighted option. Customize your settings further by navigating to the IP Addresses tab.


4. Apply Changes: Click Apply to save the changes.
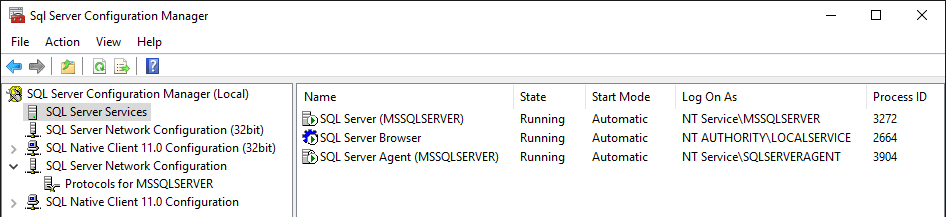
5. Restart SQL Server Service: Navigate to SQL Server Services in Configuration Manager and restart the SQL Server Service. This ensures that the changes take effect.
Additional Tips
– Firewall Considerations: Ensure that your local firewall allows SQL Server traffic. If needed, refer to our guide here on Creating a New SQL Server Firewall Rule with PowerShell.
– Testing Connections: After enabling TCP connections, validate the setup by testing the connection. Check our blog post on Testing SQL Server Connectivity with PowerShell for a comprehensive guide.
Conclusion: Enabling TCP connections in SQL Server is a straightforward process, whether you opt for SQL Server Configuration Manager or PowerShell. By following these steps and considering additional tips, you’ll ensure smooth connectivity for your SQL Server instance.
One thought on “Enabling TCP Connections in SQL Server”